Pages

Sunday, September 5, 2010

Wall Decoration

Wall Decoration

Supplies:
Canvas
Paint
Creative Mind

I bought my canvas at Michael's (it was a pack of 2 for $9.99)


Draw out what design you want to do.


Choose what paint you think you want to use.


Now, it's just making sure you paint in between the lines. (Don't worry if you mess up. Let it dry, and then paint over it. No biggie! I promise).


Then add your detailing to your picture.
Add Image


Easy Peasy, Lemon Squeezy!
Now, I just need to find a place to hang it!
Happy Craftin' Y'all!


Saturday, September 4, 2010

Cloth Bracelet

Cloth Bracelet

I got this idea off of a blog. I thought it was cute! After I did mine though, I would've done things differently, so learn from my mistakes!

Supplies:

Cloth

Large Beads

Thread

Jewelry Wire

Jewelry hook

Alright, make sure your cloth is twice the length of your bracelet. (You're going to be twisting it, so you need plenty of room to work with!) Don't make the cloth too wide, otherwise you'll make it too thick.

*I wished I would've gotten a smaller design print. When you see the ending result, you can't see my circles I chose for the fabric.*

Take the wire and attach the hook to the end. Then string your first bead.

Take your thread, and wrap it around, and around, and around, and around (well you get the picture) of the first bead to start your bracelet. Make sure to knot off the thread so it won't come undone.
* I also wish here that I would've picked a better color to blend in with the fabric more (like white).*

Now do the same thing on the other side of the bead. MAKE SURE YOU WRAP IT TIGHT! Thread on the next bead, and repeat this step until you get the bracelet the length that you want.

When you're done, attach the jewelry circle (pictured below in front of the bracelet) to the end of the wire.

Now you have a new accessory! Like I said, I would've picked a different fabric and thread, but it still turned out cute!

Happy Craftin' Y'all!

Friday, September 3, 2010

Initial Wall Decoration

Initial Wall Decoration

I owe A LOT of props to my cousin Brittni for this project. She is the most AMAZING creative painter I know :). I told her what I wanted to do, and she came up with it! The other plus side, whenever we do initials, she uses a B for Brittni, which can also be used for my last name, Bodin. So I luck out! Cute, cute!
Supplies:
Wood Board (I bought this one from Michaels for $3)
Jewelry wire (thick)
Paint
Beads
Hammer & Nail (or drill)

Take your board and paint your base coat


Next, paint your design.

Once you're done, take your hammer and nail, and make two holes on the top. This will be what you hang your board up with.

After you make your holes, you are going to take the jewlery wire and make what you are going to hang your artwork up with.
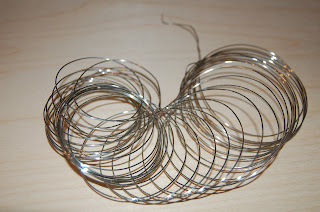


(I got this idea from Girl's Camp) Take a pen and start wraping the wire around the pen to create a "swirl" design with the wire. I did the twisting about every 2 inches, and not around the whole thing. It's your preference what you do.


Here's a picture of my completed wire.


Now take your beads, and thread them on to the wire. These are the beads I used (on sale at Michaels for $1 a bag!)


Now put the wire through the hole you made on one side, and twist it around to make it stay.

Voila! Now find a place to hang your new masterpiece!!! Thanks again Brittni!
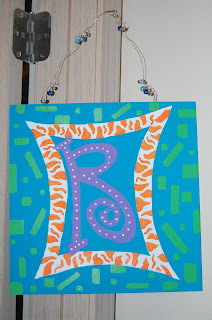

Now I have a beautiful new wall decoration for around $5!

Happy Craftin' Y'all!

Thursday, September 2, 2010

Flower Vase

So, I came home today to have dinner made, flowers on the table and......CHOCOLATE! Does my husband treat me right or what?! The only thing wrong with this picture? Yes, I know you see it. The cup vase, haha. Sadly, I do not have a vase. Being married just over a year gives me a good reason not to have all the nick-nacks of having a household of your own for a while. SO, project #1 immenses!


I took the same cup, and coated it with a layer of white paint.


If you're anything like I am, you can't stand to have those lines on it, so I coated it with 3 layers (smiley face).


I had extra ribbon and TONS of buttons laying around, so I decided to make a bow to put on my project. Come up with something creative to put on yours too!


The glass cup still looked a little plain with just the bow, so I decided to do some "vine" designs with my puff paint (again, the puff paint was just sitting on the counter).


So, here's the finished product! Not too fancy, but it got the job done!


Aren't they PRETTY?!


I love my new vase. Now, if only I can get Andrew to bring me home flowers every night so I can put my vase to good use!
Happy Craftin Y'all!

Wednesday, September 1, 2010

Epiphany


This idea all started yesterday. My mother in law sent me a link to a blog on Monday called "Make It and Love It". I saw two cute crafts that I just had to make! I posted the ending results on Facebook, and there were several people who wanted to know how I did it. So, the beginning of a blog begins!

I love to learn new things. I LOVE food, but don't necessarily love cooking, ha. I do love crafts. So, whether your crafty or not, come follow me on my new venture of a craft a day! Feel free to submit your own ideas! I'm going to need all the help I can get to come up with crafts. It's all about the creativity, no matter how small or easy the craft is.

Above are the pictures I posted on Facebook. The pink shoes are what I started with to make the other two pair. I think they turned out cute!

Happy craftin' y'all!